


Table of Contents
WHMCS Turns Your Hosting Server Into a Real Business
If you want to sell hosting, you need more than just a server and a control panel. You need a way to take orders, send invoices, accept payments, create accounts automatically, and remind customers when their bill is due. Doing all of that by hand is exhausting and error-prone. That is where WHMCS comes in.
WHMCS is the most popular billing and automation platform for web hosts. It connects to your control panel (like cPanel) and handles the entire customer lifecycle — from the first signup to automated renewals. When a customer pays, WHMCS creates their hosting account. When they cancel, it suspends it. It runs your business while you sleep.
Installing WHMCS on a cPanel server is a straightforward process, but there are a few important steps that trip people up. This guide walks you through the whole thing step by step, including SSL, cron jobs, and the most common troubleshooting fixes.
1. Prepare Your Server and Upload the Files
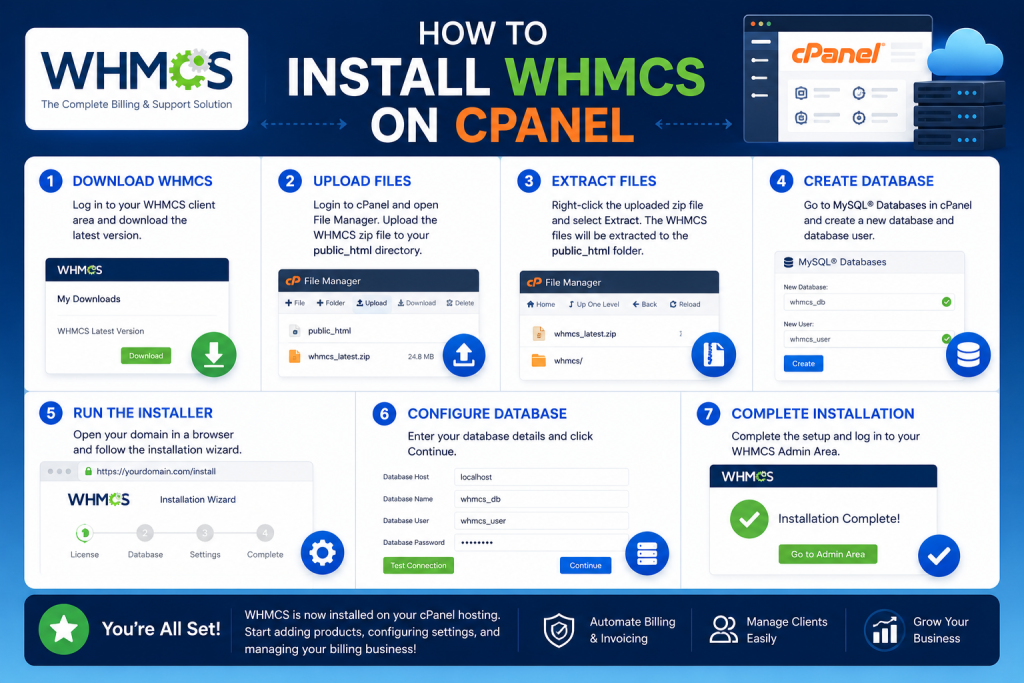
Before you install WHMCS, you need a few things ready. First, you need a valid WHMCS license and the latest software download from your WHMCS client area. Second, you need a cPanel account with a database and a domain (or subdomain) where WHMCS will live. Do not install WHMCS on the same account you sell to customers; use a dedicated cPanel account for your own billing system.
Step 1: Create the database. Log into cPanel and open MySQL Database Wizard. Create a database (for example, myaccount_whmcs), then create a database user with a strong password. Give that user full privileges (All Privileges) on the database. Write down the database name, username, and password — you will need them shortly.
Step 2: Upload the WHMCS files. Unzip the WHMCS download on your computer. Inside, you will find a folder containing all the files. Rename the configuration file configuration.php.new to configuration.php. Then, in cPanel, open File Manager, navigate to the folder where you want WHMCS (often public_html or a subfolder like /billing), and upload all the files. You can also upload the zip and extract it directly on the server, which is faster.
Step 3: Set the correct permissions. WHMCS needs certain folders to be writable. Make sure the following folders have permissions set to 755 (or 777 only if your host requires it): attachments, downloads, and templates_c. If these folders are not writable, WHMCS will show errors during setup.
2. Run the Installer and Connect SSL
Now that the files are in place, it is time to run the installer.
Step 4: Run the installation wizard. Open your browser and go to the URL where you uploaded WHMCS, for example https://yourdomain.com/billing/install/install.php. The installer will check that your server meets the PHP version and extension requirements. If anything is missing, cPanel’s MultiPHP Manager and Select PHP Version tools let you fix it quickly.
Step 5: Enter your license and database details. The installer asks for your WHMCS license key, your database name, database user, and password (from Step 1). It then creates the necessary tables. Next, you set up your admin account — pick a strong username and a long, random password, because this account controls your entire billing system.
Step 6: Secure the installation. After the installer finishes, delete the install folder. This is critical — leaving it in place is a serious security risk. Also move the configuration.php file outside the public web folder if you know how, and update the paths, for extra safety.
Step 7: Add an SSL certificate. Your billing system handles customer payments and personal data, so it must use HTTPS. In cPanel, use the SSL/TLS status page or AutoSSL to issue a free Let’s Encrypt certificate for your domain. Then force HTTPS by adding a redirect in your .htaccess file so all traffic is encrypted. WHMCS also has a setting under Setup > General Settings to enforce the secure area — turn that on.
Need the best price on server licenses?
Get cPanel, DirectAdmin, LiteSpeed & more with instant delivery and 24/7 support.
3. Configure Cron Jobs and Connect to cPanel
WHMCS only works automatically if it runs regular background tasks. These tasks send renewal reminders, process pending orders, generate invoices, and suspend overdue accounts. This is done with a cron job.
Step 8: Set up the cron job. In cPanel, open Cron Jobs. Add a job that runs once every five minutes (or every minute for faster automation). The command looks like this:
php -q /home/yourusername/public_html/billing/crons/cron.php
Replace yourusername and the path to match your setup. In WHMCS, go to Setup > Automation Settings and copy the cron command exactly as shown, since newer versions include a unique key for security. After saving the cron job, WHMCS will start handling your billing tasks on schedule.
Step 9: Connect WHMCS to cPanel. So WHMCS can create hosting accounts automatically, you need to link it to your server. In WHMCS, go to Setup > Servers and add a new server. Choose the cPanel module, enter your server’s IP address, and create an API token inside WHM (Web Host Manager) on your cPanel server. Paste that token into WHMCS, then test the connection. Once it succeeds, WHMCS can provision accounts the moment a customer pays.
Common troubleshooting tips:
- White screen after install: Usually a PHP version or permission issue. Check that
templates_cis writable and your PHP version is supported. - Cron not running: Verify the path in your cron command and check the cron log. The path must be the full server path, not a URL.
- Connection to cPanel fails: Re-check your API token, make sure the token has the right permissions, and confirm the server firewall allows connections from your WHMCS server.
- Email not sending: Configure SMTP under Setup > General Settings > Mail to use a reliable mail provider instead of default PHP mail.
4. Configure Products, Pricing, and Your First Test Order
Installing WHMCS is only the beginning. To actually sell hosting, you need to set up your products, connect your payment gateway, and test the whole flow end to end. This is the part that turns your installation into a working store, and it is where many new hosts feel unsure. It is simpler than it looks if you take it step by step.
Set up your payment gateway. Before you can take a single order, WHMCS needs a way to accept money. Go to Setup > Payment Gateways and choose a provider — popular options include PayPal, Stripe, and various local processors. Enter your API credentials and set the gateway to live once you are ready. It is a good idea to test with a sandbox or test mode first so you can confirm orders process correctly without charging real cards. Make sure the currency and tax settings under Setup > General Settings match your business location.
Create your hosting products. In WHMCS, go to Setup > Products/Services and create a product group, such as “Shared Hosting.” Then add individual products — for example, a “Starter,” “Business,” and “Pro” plan. For each product, set the price (monthly, quarterly, and annually), the description, and most importantly the module settings. The module is what tells WHMCS to create a cPanel account when someone buys that plan. Select the cPanel module, choose the server group you configured earlier, and set the package details like disk space, bandwidth, and number of email accounts. These details should match the packages you created inside WHM on your cPanel server.
Set up domains (optional but recommended). If you want to sell domain registration too, connect a domain registrar module (like Enom, ResellerClub, or another registrar) and configure domain pricing for the extensions you want to offer. WHMCS can then handle domain lookups, registration, and renewals alongside hosting.
Run a full test order. This is the most important step and the one most people skip. Open your WHMCS order page in a private browser window as if you were a real customer. Pick a hosting plan, go through checkout using test mode, and complete the purchase. Then check that WHMCS automatically created the cPanel account with the correct limits, sent the welcome email, and generated the invoice. If everything works, congratulations — your automation is live. If something fails, the logs under Utilities > Logs will tell you exactly why, so you can fix it before real customers arrive.
Taking the time to configure products and run a test order means that when your first real customer signs up, everything just works — from payment to account creation. That smooth experience is what turns a one-time buyer into a long-term customer.
Start Automating Your Hosting Business
Once WHMCS is installed, secured, and connected to cPanel, your hosting business runs itself. Customers sign up, pay, and get their accounts — all automatically. You can focus on growth instead of paperwork.
At SharedLicense, we make it affordable to run a professional hosting stack. We also offer licenses for cPanel, LiteSpeed, JetBackup, Imunify360, and more, so you can launch and scale your business without overpaying.
Ready to automate your hosting business? Join SharedLicense today and check out our software license services. Let us help you build a hosting company that runs smoothly from day one.
